

How To Register A Used Ipad
Even getting one of the older iPhone models like iPhone vii or seven Plus, will definitely bring a lot of benefits for me. And talking from my experience, you lot would probably experience some advantages too. You tin employ it for many things while at home like listening music, watching videos, playing games, etc. And if you accept kids, it will always come up handy in those stressful moments, when things get a fiddling hectic around your house.
However, before getting these benefits out of the new-to-you lot iDevice, you should fix it upwardly properly. Hopefully, the previous iDevice's owner thoughtfully prepared the iPhone or iPad for you. I am thinking of clearing out all of his data and removing the personal data. That would be your ideal instance. Then, when you get the iPhone or iPad, it would be set for you to enter your account and install all your favorite games, apps, music, etc. Merely, what if your iDevice's previous possessor didn't go that job washed for yous. Would you be able to utilize your 2d-paw iPhone or iPad if it is notwithstanding connected to its previous possessor's accounts?
Well, this scenario happened to me when I get my new-to-me iPhone. It was literally dumped off untouched from its previous owner. I guess he believes me enough to leave all its personal data on the device. However, I have never thought of using any of his personal data (OK, except at present). Anyways, before making the iDevice truly mine, I had to go through a couple of steps for setting information technology upwards.
So, the answer to the question "Would you exist able to use the iPhone or iPad?", is YES you can, merely only if you do the correct set. Otherwise, you may end up with a useless locked device. Do not worry, in this commodity yous got all the steps you lot need to take to ready up your used iPhone or iPad. So, permit's start.
Before You First
You actually don't want to proceed previous possessor'due south information on your iPhone or iPad. Then, the outset affair that you lot would need to do is to go that information out of your iDevice. Please keep in mind that all the apps installed on the new-to-you lot iPhone or iPad are tied up to the previous owner'due south Apple account. So, they volition no longer be available when y'all delete the old Apple ID from the device.
If you really similar some games or apps, take notes and recollect that you volition need to download or purchase (if they are paid apps) them again. All the good things in the world come with a price. And, if y'all are wondering whether to spend a couple of bucks on some great apps from the Apple App Shop, I would definitely encourage you to practice then. After you are done with the preparations, you lot can commencement setting up your iPhone.
Step i: Turn off Find My iPhone, iCloud, and Photos
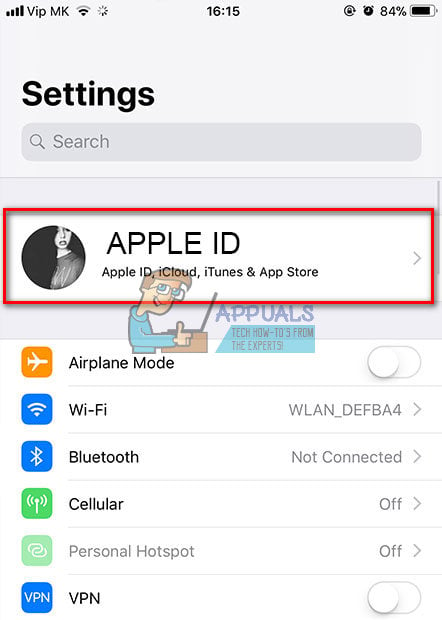
One of the crucial things when receiving a used iPhone or iPad is to remove the Apple ID from the iDevice. First, you need to cheque if at that place is an Apple ID connected to your iOS device. Here is how to do that.
If your device runs iOS 11 or later
- Go to Settings and bank check if in that location is an Apple ID at the superlative of the screen.
If your device runs iOS 10 or older
- Search for the section iCloud in
- Check if at that place is an Apple ID in this section.
If your device doesn't have Apple ID connected to information technology, yous are good to go. Still, if your device is connected to its previous owner's business relationship, you volition need to exercise the post-obit.
Check if Detect My iPhone, iCloud, and Photos are activated. If they are on, contact the previous possessor of the iDevice to disconnect your device from its Apple tree ID. The good news here is that he/she can practice the disconnecting remotely. Yous can cheque the post-obit part for more detailed data virtually the procedure.
How to Remove iPhone or iPad from iCloud Remotely
The disconnecting process is pretty simple, here are the steps.
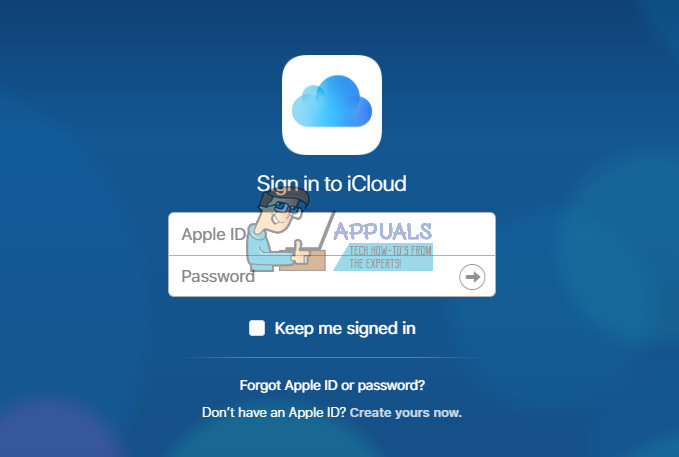
- First, ask your iDevice'due south previous owner to sign in to their iCloud business relationship. Hither is the link icloud.com/find
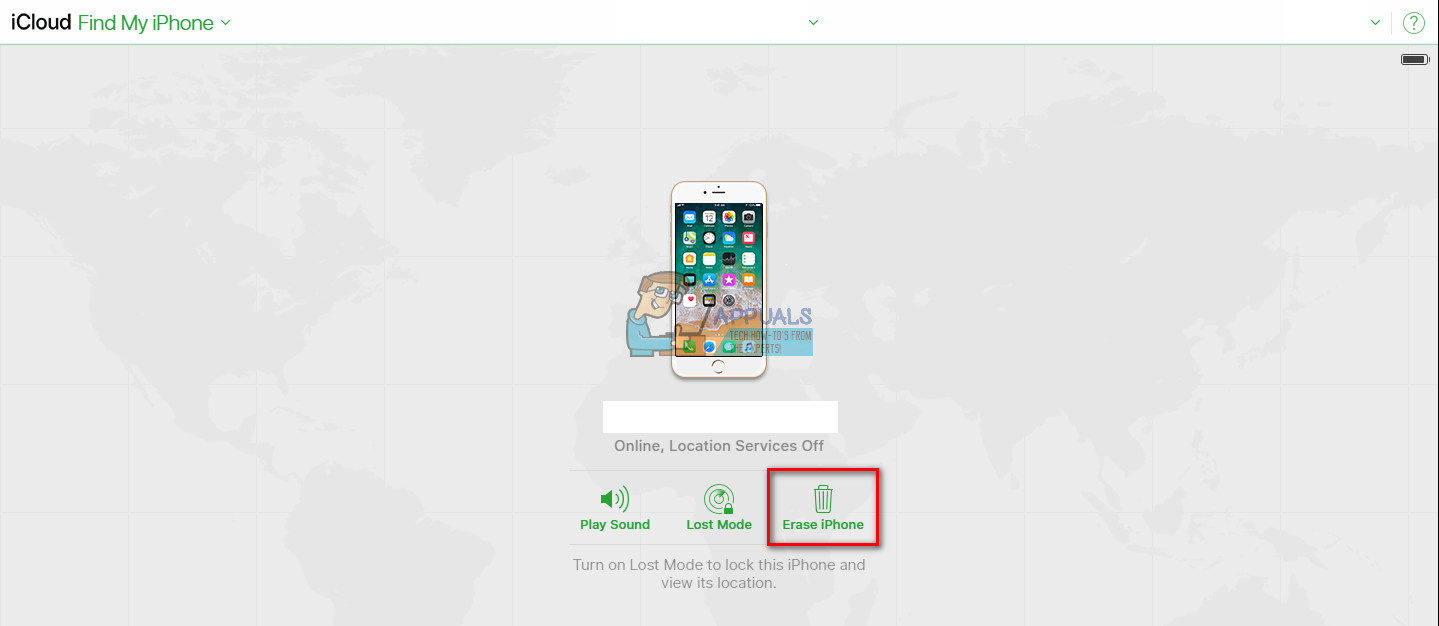
- Later he/she logged in iCloud, tell them to disconnect the iDevice from the Devices They just demand to select your iPhone or iPad and click on the Erase iPhone/iPad button.
- When the device is erased he/she should click on Remove.
If your iDevice's previous owner used Apple tree Pay, he/she would demand to remove your iOS device from that service too.
How to Disconnect Your iDevice from Apple Pay Remotely
- Ask the previous owner to get to iCloud.
- Tell her/him to become to Settings and check which devices are using Apple tree Pay.
- If your device is active, inquire her/him to remove. He/She can exercise that by clicking on Remove next to Apple Pay.
If the person your device was owned before doesn't know his/her Apple ID or password, he/she tin contact Apple tree and practise the recovery process. For more than info nearly this process check the following links.
Forgotten Apple tree ID: https://back up.apple tree.com/en-us/HT201354
Forgotten Apple tree Countersign: https://back up.apple tree.com/en-us/HT201487
The Worst Scenario Possible: What if You Exercise Not know the Apple ID and Countersign and Tin NOT get in Touch With the Previous Owner?
Unluckily, correct now there is NO way to remove an Apple ID from an iDevice if you Practice NOT know the password of the account continued to that device. This is a security blockage put in place by Apple to aid gainsay the theft. And, from the information that we have, in that location isn't a legal mode to pass this blockage.
And so, before restoring, erasing, or updating your iPhone make sure that its previous owner turned OFF both Detect My iPhone and iCloud. Do NOT remove personal data from your iPhone if these features are ON and you tin can not get in touch on with the previous owner of the device.
But later on y'all turn them off, you tin can delete all the personal data, apps, and other preferences that its previous owner used.
Step ii: Update Your iPhone to the Latest iOS
Another practiced practice is to update your new-to-you iPhone or iPad to the latest iOS before performing a total erase. Nearly iFolks do not care about their older iDevices when they become a new 1. So, the chances are your used iDevice is running an outdated iOS version. At this point, yous don't have any personal data on it. Then, y'all couldn't lose anything. Go alee and update the iPhone or iPad to the latest version of iOS.
Apple tree makes the update procedure very easy and unproblematic. You lot tin can exercise it right on your iDevice itself. You do non need a computer to finish the procedure. If for any reason, y'all want to perform the update on your computer, you can too do that using iTunes. Merely, I personally observe information technology easier to perform straight on my iDevice.
Annotation: Earlier starting the update process, make sure your iDevice has enough battery juice and is connected to a solid Wi-Fi network.
How to Update Your iDevice to the Latest iOS
Here are the steps you lot need to take in social club to update your iDevice to the latest iOS version.
- Go to Settings.
- Navigate to General and open the Software Update
- Wait for your iDevice to bank check for updates.
- Tap on Install Now.
When I received my iPhone, it was running on iOS nine.3.2. I updated it to the latest iOS 11 at that time, and I experienced a huge improvement in the speed and bombardment life, as well equally many dandy new features.
Afterwards you update your iDevice, you need to perform some actions to clear out all the previous owner information.
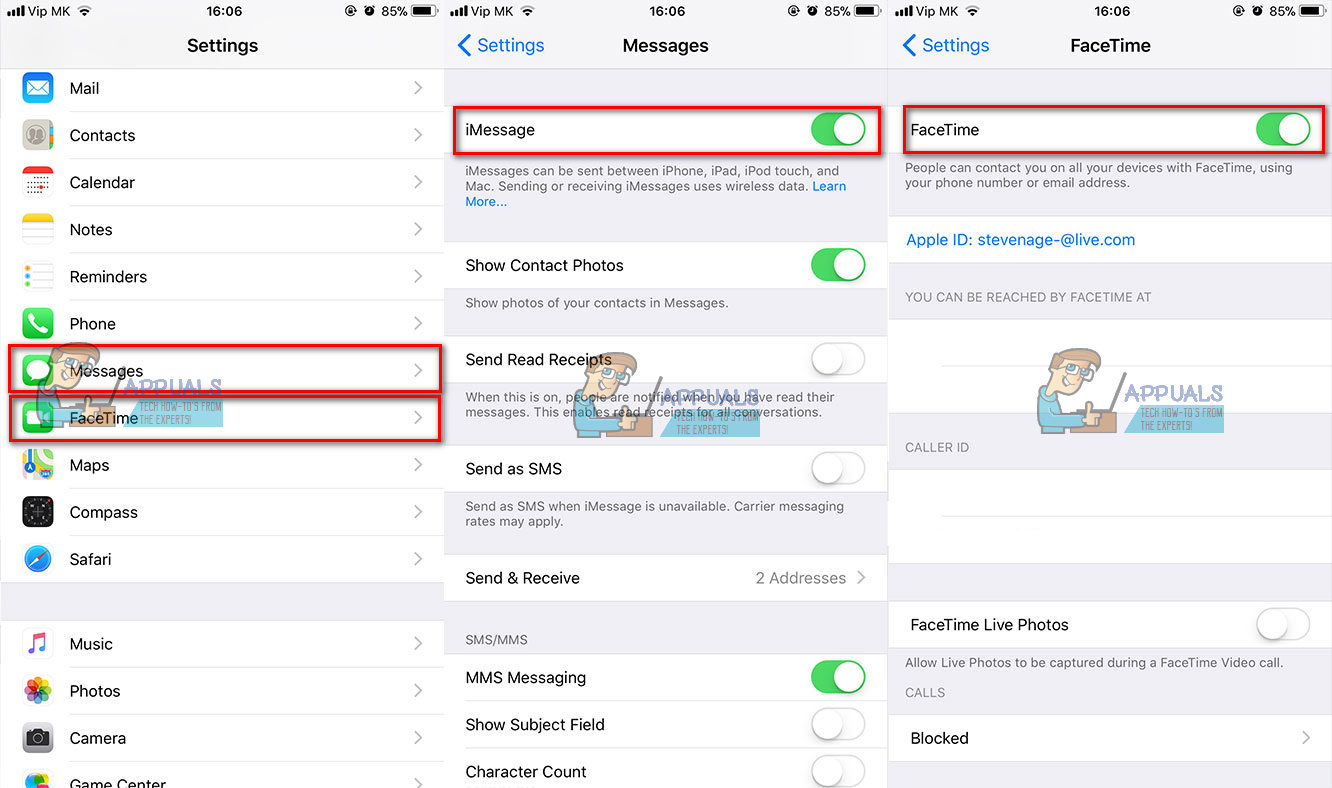
Step 3: Turn Off iMessage and Facetime
Some other affair that y'all need to practice before performing a full iDevice erase is manually turning off the iMessage and Facetime services. Of course, you must be sure that your iPhone or iPad is disassociated from the previous owner'southward individual info and text messages.
- Go to Settings and open the Letters
- Turn off the toggle in the iMessage (Make sure information technology becomes grey)
- Go back to Settings and open the FaceTime
- Turn off the toggle in the FaceTime (Make sure information technology becomes greyness)
Pace 4A: Erase Your iDevice From its Settings
Now it is time to erase your iDevice. Here is the procedure.
- Go to Settings and click on the Apple tree ID connected to your iDevice (the very showtime field in Settings). If your device is running iOS 10 or older, click on the iCloud section in Settings.
- Tap Sing Out.

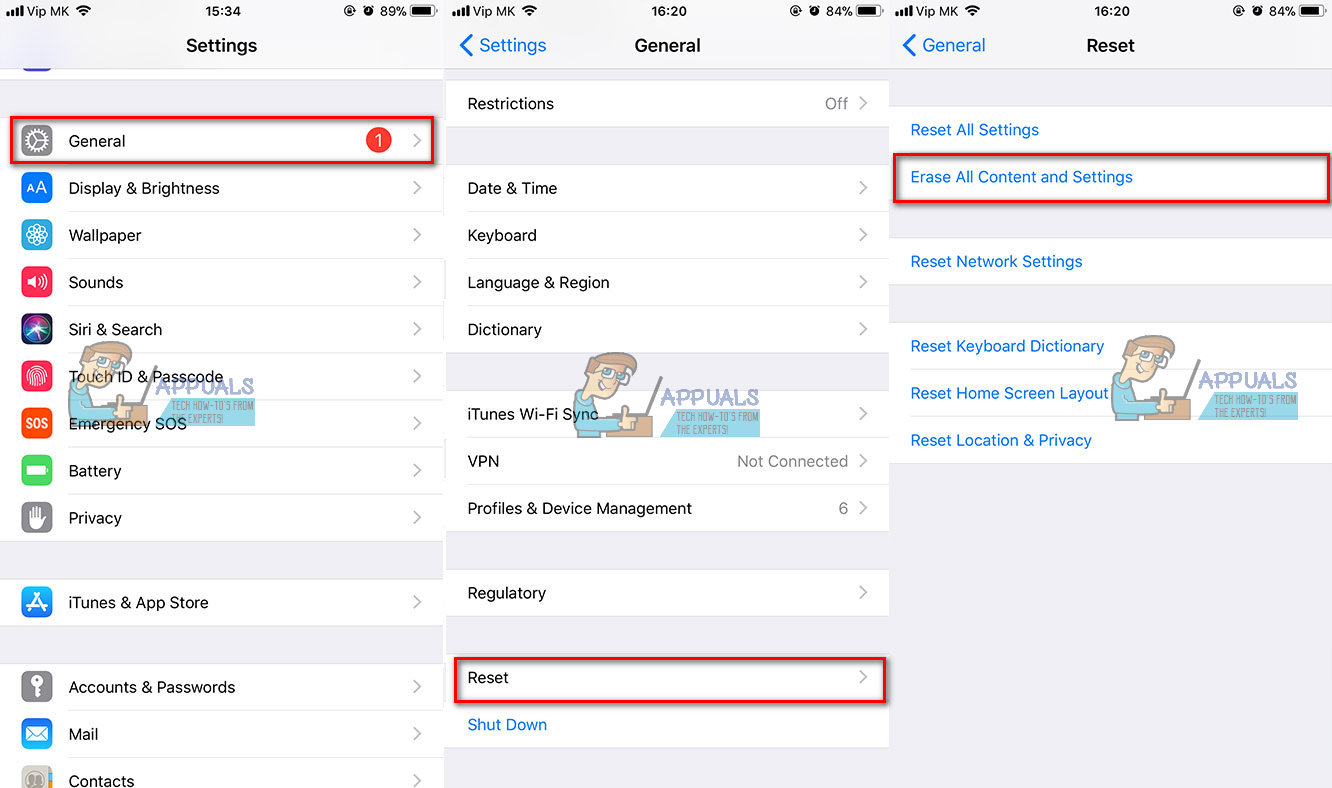
- Go back to Settings and open up the Full general
- Navigate to Reset and click on information technology.
- Click on Erase All Content and Settings.
- If the device has a passcode or Restrictions passcode, you need to enter information technology before the erasing process starts.
- Wait for your iDevice to terminate the process. When the erasing procedure finishes, your device volition reboot without any information on information technology.

Step 4B: Erase Your Device Using iTunes
Besides the procedure for erasing your iDevice from its Settings, you lot can do it using iTunes on your computer.
- Connect your iPhone or iPad to a PC or Mac.
- Launch iTunes on the computer.
- While your iDevice connected, perform a force restart. (For more information how to exercise a force restart on your particular iPhone or iPad model bank check this commodity https://appuals.com/set-iphones-dead-wont-plow-on/)
- When y'all see the recovery style screen on your iPhone, you can go along to the adjacent action.

- From the popular-up dialog message that appears on your computer with the Restore and Update options, cull Restore.
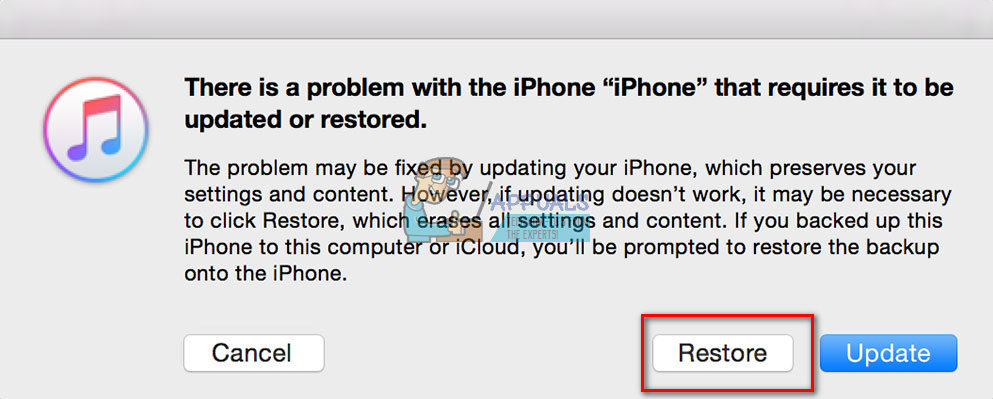
- iTunes will automatically download software for your iDevice.
- If the downloading takes longer than xv min, your device will exit the recovery style.
- If this happens, repeat the actions for inbound the recovery mode.
- Wait for the restore process to stop. When the iDevice is done resetting to manufactory settings, information technology will restart as if information technology was brand new.
Just in instance there is annihilation else lingering around that connects your iDevice to its previous owner, let's do a couple of steps.
Stride 5: Dissasociate Your iPhone or iPad From its Previous Owner's Apple Account
You do non need to perform this pace if you disconnected your iDevice from its previous owner's account earlier. However, if yous didn't follow the steps higher up, when turning off Find My iPhone and iCloud, make sure you do it now.
Note: Yous will need to contact the previous owner of your iDevice to perform this procedure.
- Open up the Apple ID Site.
- Log into your iDevice's previous owner account. (requires Apple tree ID and Countersign).
- Select your iDevice.
- Click Remove.
You should besides do this process if you are giving your iPhone or iPad to a family unit member or friend, or selling information technology.
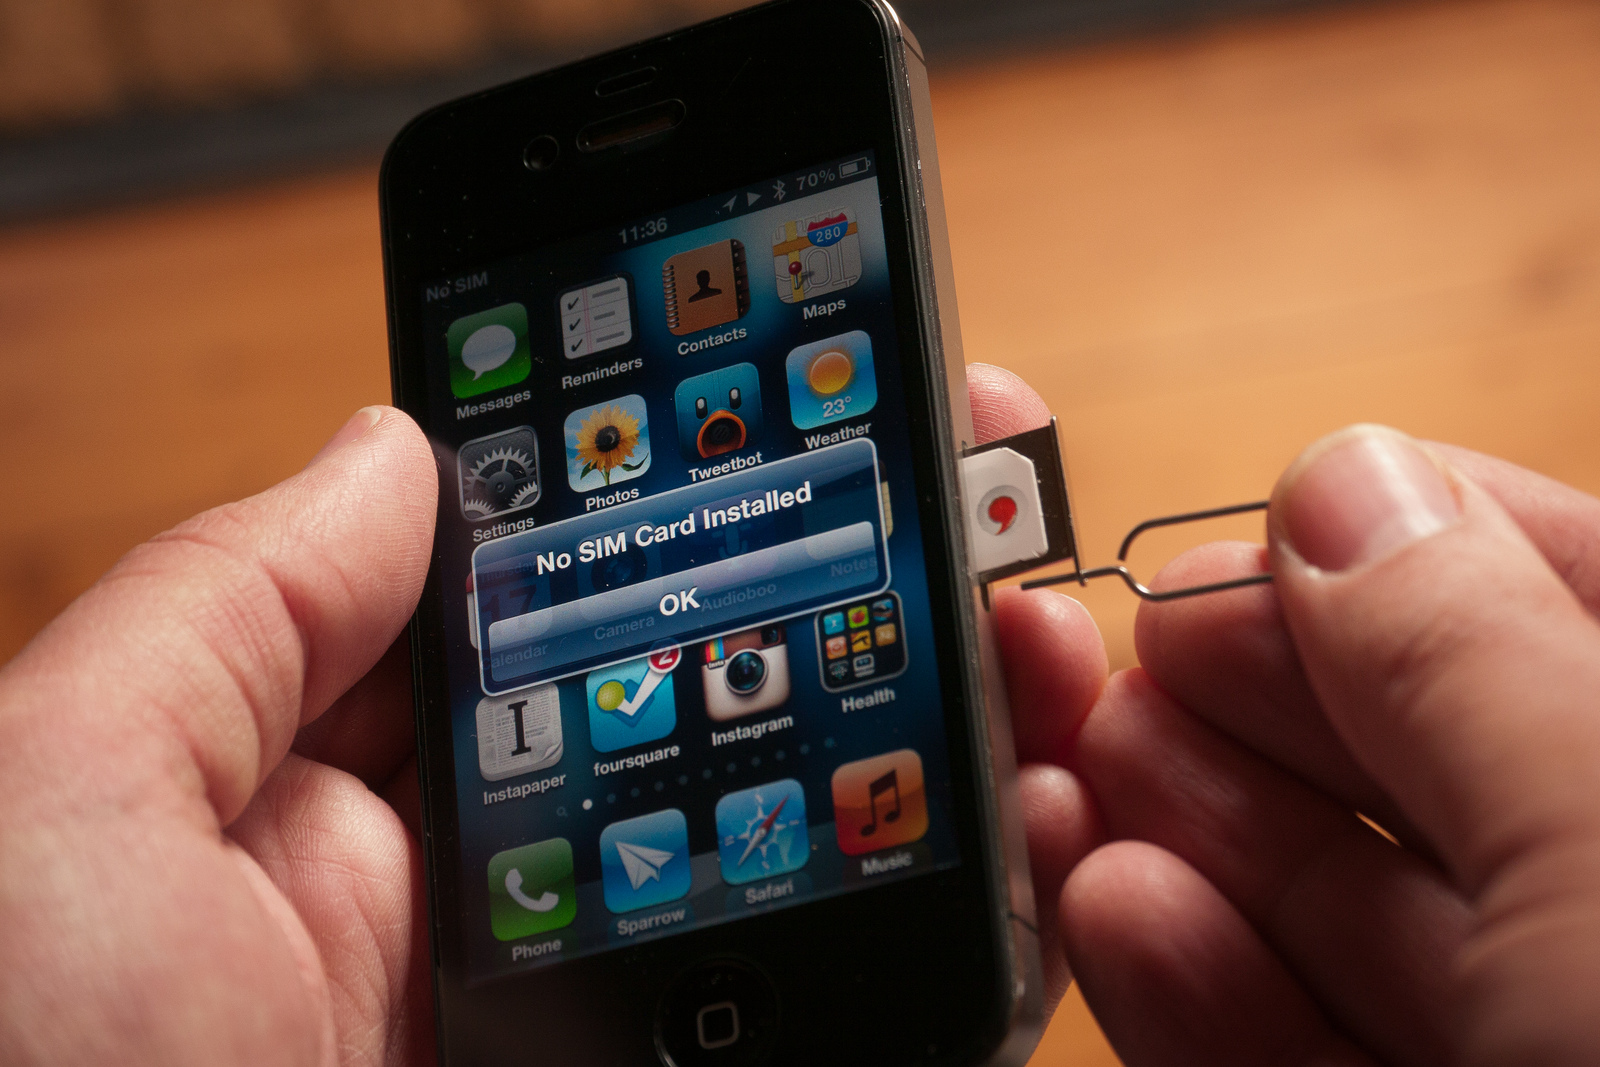
Stride six: Remove the SIM Bill of fare From Your iPhone or iPad
SIM cards can also be a place where previous users stored some contacts and letters. Then, information technology is important to remove it to get rid of all that data. Additionally, if you want to use the iPhone as your daily driver smartphone, you would probably desire to insert your own SIM card. Hither are the steps you demand to take to remove the sometime SIM menu and insert the new one.
- Become a SIM Card Eject Pivot or paper clip.
- Locate the SIM slot on the side of your iPhone.
- Button the pin through the SIM pigsty.
- Remove the one-time SIM Card.
- Insert your new SIM Card into the cardholder.
- Shut the SIM Card slot.
Go along the previous owner'due south SIM Card in a safe place (abroad from magnets and electronic devices that may erase it). You may need it later on if y'all like to apply your iPhone as an iPod Affect. Likewise, the previous owner may need that SIM Card back. So, better play prophylactic than sorry!
At present, when you lot cleared all the sometime user junk, you are finally ready to brand that iPhone or iPad your OWN.
How to Prepare an Used iPhone, iPad, or iPod Touch
After performing all the steps for cleaning the digital junk to a higher place, this will be the near interesting part.
- Turn on your iDevice, and friendly "Howdy" will appear on its screen.
For the users with limited vision, plough on the VoiceOver feature or Zoom from this Howdy screen.
- If you need the MEID/IMEI/ICCID, tap the "i" icon in the lower correct corner. (Some mobile providers require this to connect the device to their network)

- Cull your linguistic communication and country.
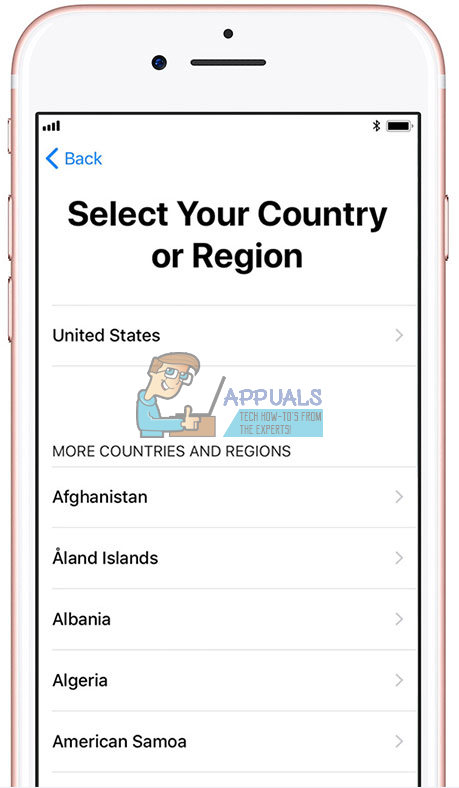
- Connect to a Wi-Fi network or Mobile Connection.
- Cull if you want to enable or disable the location service. (This service is required if you want to enable Find My iPhone/iPad)
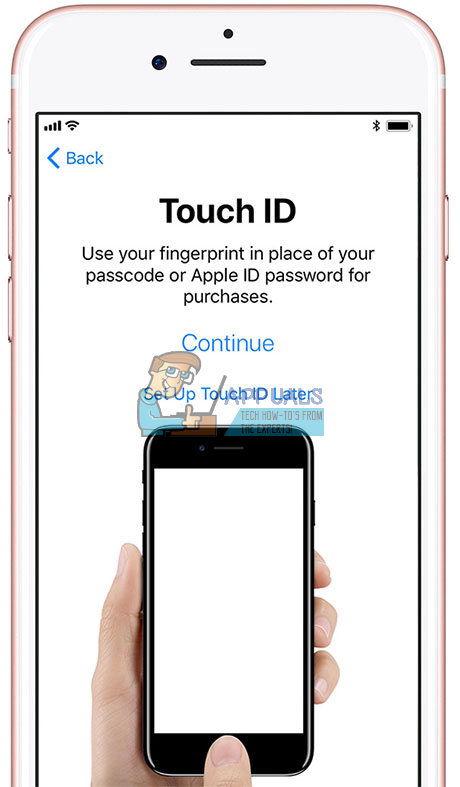
- Set up your Touch on ID and Passcode. (You tin also skip this step, merely nosotros highly recommend performing it for higher security)
- If you want to restore your iDevice from a backup file, you tin do that here. (You can even transfer data from an Android phone)
- Sign in with your Apple ID or create a new Apple tree ID. (Y'all can as well skip this step if you want)
- Set upwards, Siri. (You can skip this)
- Set your App analytics. (Hither you cull if yous want to share info with app developers)
- Cull your iPhone's Display Resolution. (If you lot accept an iPhone 6 or later, you tin can choose between the standard or zoomed resolution)
Final Words
The iPhone or iPad you've got now is ready to exist your Ain. Start using it and have some fun with information technology. Download your favorite apps and games, brand phone calls, send messages, and put the music you lot like on it.
Additionally, do not forget to dorsum information technology up regularly! That's how you lot will preclude losing your personal information even if you lost your device.
There is goose egg else I would like to say except congratulating you for successfully setting up your iPhone or iPad. I wish you wonderful digital adventures with countless happy moments.

How To Register A Used Ipad,
Source: https://appuals.com/how-to-setup-a-used-iphone-or-ipad/
Posted by: mullanaforeg.blogspot.com
0 Response to "How To Register A Used Ipad"
Post a Comment